If you need kitchen cabinet, then you can make it yourself. Although building kitchen cabinet doors are doable, it is tough as well. Sometimes, this task requires powerful and expensive equipment. Saving own kitchen cabinets can save you a lot of money on your kitchen decoration. Here, there is the complete process of building kitchen cabinets with a custom look in a natural way:
Step: 1
Work on Dimension and Design
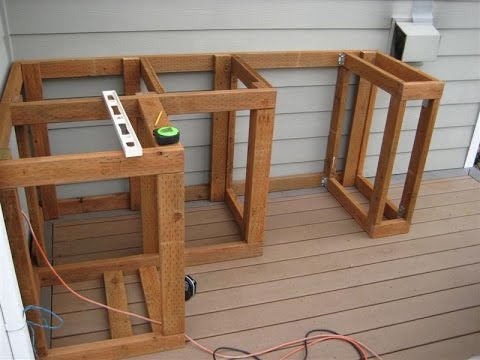
The building will start by creating a single utility cabinet and after that changes will be made when minor modifications to kitchen cabinetry are enough. The model can be 48 inches wide, 24- inches tall and 18- inches deep, you can change the dimensions to fit your particular installation if need.
Step: 2
Partition of Shelves
In the process, you will cut two shelves which are 18- inches by 47- inches and then another at 17-3/4” X 47”. You can use your table saw, or a circular saw to rip the cabinetry shelves to the perfect widths and lengths.
Step: 3
Cut the Shelf Dadoes
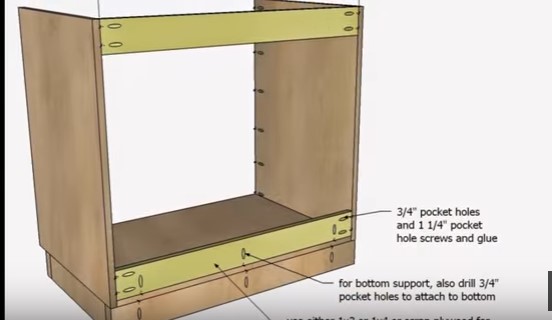
When you measure the height and depth of the cabinet, you cut two identical pieces from one of the sheets of ¾” plywood. Now, set the fence on your table saw to 1/1-2 from the opposite side of the dado.
Step: 4
Cur the Rabbets
When the matter comes on kitchen installation, and we are talking on how to build kitchen cabinets, you may sue a piece of ¾” plywood as the backer of the carcass, and screws will be driven by this back to protect it to the wall.
Step: 5
Assemble the Cabinet
Take a large table, lay down the right shelf standard and dry-fit each of the three shelves into the correct place on the front side of the cabinet. After it, dry-fit the left shelf standard on the highest level of the three shelve to ensure that all joints have a snug fit.
Step: 6
Proceed to Install the Back
You need to cut a piece of a/4” plywood to 47-1/4” X 18”, lay the assembly flat onto its front-side on the table and look it for square. In the next phase, place the ¼” plywood onto the back of the assembly.
Step: 7
Rip and Mount the French Cleat
First of all, cross cut a clean, straight 2X4 to 46-1/2” in lights, and in next set up your table saw with the ripping blade and title the arbour to 45-degree angle. Next, mount the other French Cleat wedge against the wall and use 3” screws to drive it into the wall.
Step: 8
Cover the French Cleat
At this point, cut a 1X2 to 46-1/2 in length and by using the finish head nails, attach the piece to the top of the case’s back.
Step: 9
Do Trimming
The last word working stage is to do trimming the front of the cabinets. Check that the cupboard assembly in exactly 48” wide and cut one 1×2 to the same lights and proceed for other works.
Step: 10
Finishing
Now, you are almost done, you can escape from the further process if you don’t want to paint your product.


