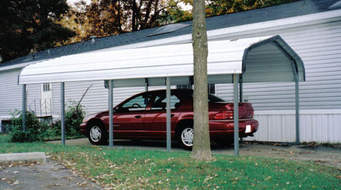
Carports are the standalone structure which is very useful for protecting cars and other vehicles from bird droppings and other elements like dust and dirt. If you park your vehicles outside and trouble for you then you need to make some investment in the protective structure to park the cars.
Carports will help you maintain the luster of your car and increase its lifespan. But, it’s also a fact that the carport can be built in a morning, it needs a proper planning. You will have to plan the appropriate structure, here we are listing all points that are important to make a carport in step by step manner:
- When you are going to start, at first you need to find out about what building permit and building restrictions are present in your community. Because this will let you know that whether you have right to build a carport or not.There are waiting for periods and cost connected with the obtaining building permits, so ensure you know about it.
- The second step is to clear the area what the carport is going to go. Set out the parameters, be careful while establishing the corners, and drive in four pegs at each corner and build simple hurdles. Stretch string lines from one hurdle to the next will create a string recent angle about meters long and three meters wide.
- Dig the post holes in every corner, in this regard the local council will suggest the size of the hole depending on soil classification, now mix enough concrete and making sure it’s well packed.
- Leave the saddles for about a week to let the concrete set properly. Now, put up the posts. Then brace them on two sides so they can be able to stand exactly upright. Just drill through three holes in the saddle and the post.
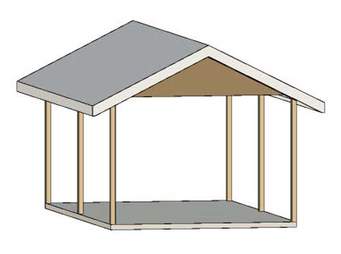
- As long as the carport is established on the levelground, you need to establish a datum line around the posts; it will give the roofing ends up a level. Now, first of all, make a pencil market about a meter up and drive a nail into the timber at the pencil mark and proceed for further activities.
- Now, you need to cut the beam housings when the posts are on the ground. Proper cutting will give the beams to sit in place flush with outside of every post. Put up the posts again and use a spirit level to ensure they are vertical and re-brace.
- To fix the side beams, drill two holes and secure every beam in the place having 90mm coach screws.
- The next step is to put the rafters; they are the lengths of timber which support the roof.
- In this step, just attach the gutter by using gutter brackets afraid the end beam below the line of roofing.
- Select the best product from various kinds of roofing sheets available and put on the roof to ensure a waterproof edge.
Your carport is finished almost, but it is advisable to coat all the timber with the timber stain or paint.


